To start off, you must know how to model a car. To learn how to do so, read and follow Silent1Unknown's tutorial.
So now you've modeled a car, and decide you want it to be in MM2's traffic. Once you have a car modeled, it's very easy to put it in traffic.
To start off, you must rename certain parts of your car in zmodeler. Here are the part names:
BODY_H/M/L/VL = The main body object, H = high quality, M = medium quality, L = low quality, VL = very low quality (you all of them for traffic - you can just copy one
and use it for all)
SHADOW_H/M/L = The shadow object, (I recommend you put all of them, since I'm not sure which are needed - once again, just copy one object...)
HLIGHT_L = The headlight object (for both headlights)
TLIGHT_L = The tail/brake light object (for both tail/brake lights)
SLIGHT0_L = The left signal light, front and back
SLIGHT1_L = The right signal light, front and back
WHL0_H/M/L/VL * = The front left wheel (all levels of detail needed - same goes for the other wheel objects - can just copy the object to make them)
WHL1_H/M/L/VL * = The front right wheel
WHL2_H/M/L/VL * = The back right wheel
WHL3_H/M/L/VL * = The back left wheel
HEADLIGHT0_H * = The left headlight (not tested, probably works)
HEADLIGHT1_H * = The right headlight (not tested, probably works)
BOUND = The boundary for the car - should surround the BODY object - MM2 needs this to determine what vertices collide with the objects in the game, since calculating that on a high poly BODY would be too much work for the game.
* requires :m after the part name (eg. HEADLIGHT0_H:m). The :m suffix is required for zmodeler to create the .mtx file.
So now everything's named properly, and you're ready to export it. You export traffic vehicles the same way you export player vehicles:
I have not got multiple paintjobs to work, so use at your own riskNow, go to File>Export and a box will appear. Get into the GEOMETRY folder, name the file "cherokee" and save as .pkg.
Hit Save and another box will appear. If we didn't have multiple paintjobs, we'd just click Export next. But we do have multiple paintjobs, three of them, so check the Multiple
Colors (paintjobs) checkbox.
Then, click the Remove button until the list on the far right is cleared. The one texture that we used in modeling the car is the "cherokee_green" texture. So, where it says
[Replace suffix:], type in that box "_green".
We have two colors remaining. Recall the order in which we put the color names in the INFO file (Green|Blue|Red). Green is already done. In the [...with suffix:] box, type in
_blue and click Add to List. Then type in "_red" in the same box and click Add to List again.
Finally, click Export. You may exit ZM.


Now instead of naming the pkg file "cherokee", you're going to give it the same basename as the vehicle you want it to replace. Here's a list of the traffic vehicle basenames, and a picture or description of them:
va_2sitersport_l.pkg

va_bus_f.pkg
The big gray bus in San Francisco
va_cab_l.pkg
The black London cab
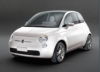
va_cooper_l.pkg
The classic Mini in London traffic
va_ddbus_l.pkg
The double decker bus in London traffic
va_diesels_s.pkg

va_euro_l.pkg

va_eurocargo_l.pkg

va_2siter_s.pkg

va_compact_s.pkg

va_eurovan_f.pkg

va_largesuv_s.pkg

va_limo_f.pkg

va_minivan_s.pkg

va_pickup_f.pkg

va_sedans_s.pkg

va_smallsuv_s.pkg

va_taxi_f.pkg

va_ultrasport_l

va_wedelivertruck_f.pkg

So export as one of those basenames, and it will replace that vehicle. This method does not require any tuning modification, just the BOUND, GEOMETRY, AND TEXTURES folder.
The BOUND folder is taken care of by zmodeler (as long as it exists before you export).
The GEOMETRY folder is where you should export the car.
The TEXTURE folder is where you should put the textures for your car once exported.
Textures must be in .bmp or .tga format, and a resolution that is a multiple of 64 (eg. 128x128, 256x256, 512x512, etc). I believe the max resolution is 4096x4096, but you should not need anything over 512x512 (1024x1024 max) for the traffic vehicle.
Once you have the car exported and all textures in the TEXTURE folder, you may now create an .ar file so that MM2 can use your mod (to create the ar file, you will need WinRAR)
Once again, you don't have to name it "03 Grand Cherokee.ar". I recommend something such as "!name's_traffic.ar".Now go to where the three folders are. When you're sure everything is perfect, select or highlight all three folders, right-click and go to Add to archive...
A box will appear. The FIRST thing is to change the archive format to ZIP. SECOND, change the name (before the .zip part) to whatever you want. THIRD, change the .zip to .ar.
Finally, click OK and you will get YOUR VERY OWN AR FILE!!!
Clarification: Final name before pressing OK, should read "03 Grand Cherokee.ar"
You know the rest, stick this ar file in the MM2 directory and have fun playing with your car.


Now, like Silent1Unknown said, put the .ar file in your MM2 folder and enjoy
I hope this helps some people out, as I don't think there was a different tutorial on this
Thanks to Silent1Unknown for his car-making tutorial (and the bits and pieces I stole)
How To Edit Traffic Tuning In MM2
Maybe you've created your own traffic or you're just not happy with the tuning of the traffic vehicles, so you want to change the way the traffic works. Well, you may not know how to do that, so this guide will help you with that process.
To start off, you will need two programs:
- DeAR2
- WinRAR
To modify the tuning of the traffic, you will need to obtain the tuning files - this is where we use DeAR2.
Open DeAR2 and browse mm2core.ar:

Now select the tuning file (*.aiVehicleDate) for the vehicle you would like to modify, then click extract. You may now exit DeAR2. (vehicle tuning files are located in tune/vehicle) (use basename guide above):

So now you have extracted the tuning file that you would like to modify. It will be located in a folder called "tune" in your MM2 folder. Double-click the file, and choose to open it with notepad. This is where we do the editing.
Here is a description of the ai tuning file, using va_largesuv_s.aiVehicleData as an example:
type: a
aiVehicleData {
Mass 495.837036 - The weight of the vehicle, in kilograms.
Size 2.186431 1.448595 4.722820 - I believe this controls the size of the bound, to make things even simpler for the game. Co-ordinates are in order car height, car width, car length. Measured in meters.
MaxAng 0.000000 0.000000 0.000000 - Not sure what this does, it probably shouldn't be changed.
Elasticity 0.900000 - How much you will rebound when you hit this car. Lower will make it absorb impact more, higher will make you bounce off of it.
Friction 0.100000 - How much the vehicle will slow you down when you hit it.
MaxDamage 119666.960938 - The max amount of damage the vehicle can take before it stops moving.
PtxThresh 119666.960938 - Seems to be the same as MaxDamage.
Spring 29916.740234 - Springiness/bounciness of the suspension. Higher = more springy, lower = less springy.
Damping 2094.171875 - Softness of the suspension, lower = softer, higher = stiffer
Limit 0.070000 - How much the suspension may be compressed - a lower number means it can be compressed more.
RubberSpring 20941.718750 - Springiness of the tire? Not really sure what this does... don't bother changing it.
RubberDamp 1047.085938 - Softness/hardness of the tire? Not really sure what this does, but it's exactly half of Damping.
CG -0.000003 0.998582 0.086628 Center of gravity of the vehicle, in order of X, Y, Z. I think this is measured in meters from the center of the model...
}
There's no reason to change most of this stuff... Chances are you'll only need to change the Mass, Elasticity, Friction and Damage to get the results you want.
That was pretty simple, huh? Now to get it in game, you have to re-package the file to .ar, using WinRAR:
Now obviously you don't have to name it "03 Grand Cherokee", but you must include the ".ar" at the end instead of .zip.Now go to where the three folders are. When you're sure everything is perfect, select or highlight all three folders, right-click and go to Add to archive...
A box will appear. The FIRST thing is to change the archive format to ZIP. SECOND, change the name (before the .zip part) to whatever you want. THIRD, change the .zip to .ar.
Finally, click OK and you will get YOUR VERY OWN AR FILE!!!
Clarification: Final name before pressing OK, should read "03 Grand Cherokee.ar"
You know the rest, stick this ar file in the MM2 directory and have fun playing with your car.
Hope this tutorial helped you out